Wednesday, June 30, 2010

How Did I Live Without This?!?

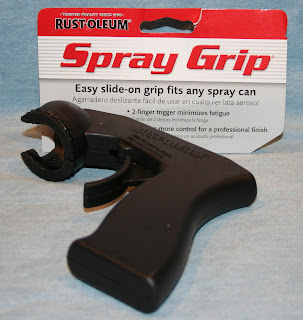
After today, this is what I'm asking myself.  This handy dandy Spray Grip has changed my painting life!  Not only does it save me from "trigger finger" when spray painting, it also makes the paint come out much more evenly.  I think I paid $2.99 or less for it at Home Depot. If you don't have one, get one.  Like today.  So worth it!
I am still working on my 10 Tasks in 10 Days Challenge.  I am almost finished my apothacary jar, just waiting for the glue to dry.  I will post pictures tomorrow or Friday, depending on when I get to the store to buy some pretty candies to fill it up!
I actually think I may finish 9 of the 10 tasks.  I know I won't get to the bathroom cabinet this week, just too busy at work.  But I'm hoping to get to it this weekend.  I'm still deciding which color it's going to be painted.  I'll probably just go with white or off white on the outside, and I'd like to do a bluish grey on the inside.  Here's a peek at it as it looks now.  I'm thinking I'll replace those ugly black handles with metal handles.  I don't know what to do with the top, it's formica.  I don't like it at all, but at least it cleans up easily. (Please disregard the bathtub caulk in the picture that needs to be cleaned up with a straight edge...keep in mind we're renting this house and sometimes you have to grin and bear the uglier stuff!) 

Always,
Kelly

Sunday, June 27, 2010

10 Tasks in 10 Days - Halfway There

The good news is that I'm proud to say that I'm slightly ahead of the game at this point.  I have completed 6 of my 10 tasks. The bad news is that I probably won't have time to complete the other 4 tasks until at least Friday or Saturday.  The last week of the month is crazy for me at work and I am usually completely stressed out.  Not to mention that the weather here has been averaging between 95 to 100 degrees and it's been too dang hot to paint out in the sun.
That being said, come take a look at some of the stuff I have completed!

These book ends were inspired by Bridgette & Rebekah over at All Thingz Related.  When I saw these, I knew right away that I wanted a pair of my own!  I am so happy with how they turned out.  They were really easy to make and I'm thinking of making another set using bright colors to use in my office space.

Next came my pincushion.  I have had this thrifted metal thingy (that's the technical term) for over a year.  I knew I wanted to make a three tiered pincushion out of it, but never quite got around to it.  It has made its way into and found its way out of my donation boxes about 5 times now.  I decided it was time to get it done already.
I like how it turned out, although I'm not completely happy with the top level.  It didn't sit right and I redid it once and then gave up and left it alone.

Then came Nanny's chair.  I removed the seat, which was much easier than I had anticipated, and began to prep the wood for painting.  That's when I found the the wood had some kind of veneer overlay.  Ugh, not sanding friendly.  I think I'm going to just lightly sand it and paint it instead of sanding it all the way down as I had originally planned.

But the painting cannot be done until I decide what fabric to use to cover the seat.  I've narrowed it down to four.  Any opinions would be much appreciated.  Below are my final 4.
Choice A is from the Basic Grey Line "Blush".  If I choose this, I would probably paint the chair to match the aqua color in the fabric.

Choice B is an Amy Butler fabric that I've had for awhile.  I think I originally bought it to make a tote bag.  If I choose this one, I would paint the chair to match the green in the fabric.
Choice C is the Cogsmo line by Cosmo Cricket.  I adore this line.  I love the colors and all of the fabrics.  Any time I find a stray piece of it at a quilt show or shop, I buy it.  I just don't know if the stripes are where I want to go with the chair.  And if I choose this fabric, I don't know what color I'd paint the chair...maybe teal or red.
Last but not least is choice D.  This is a funky fabric that I picked up for it's bright colors.  Originally I bought it to make a pinwheel quilt, but ended up finding another fabric I liked more.  I'm leaning towards this fabric with the chair painted bright red.

So where are you in your tasks?  Is anyone finished this early in the game?  Please let me know what you think of my completed projects and weigh in on which fabric you like for the chair!

And don't forget to visit Gina at The Shabby Chic Cottage for lots of inspiration and tons of linkys to those participating in the 10 Tasks in 10 Days Challenge!

Always,
Kelly

Flea Market Finds


Before I share my finds for the day, I have to share the important lesson I learned today:  When you are going to Yard Sales and Flea Markets on a 95+ degree day, stay hydrated.   I'll spare you the details, but suffice it to say that I missed my niece's graduation party because I didn't follow that little piece of advice.

Moving on...

I scored a few really good items today that I can't wait to work on!  At the very first flea market I found this scruffy table for $3!  It definately needs some work because of the water damage on the top, but I love that it has 2 drop leaf sides.  Once I redo it, it will look great in my living room!

The next smaller flea market at a church netted me two more finds.  The first was a metal table with an enamel top.  Unfortunately, I didn't notice the gouge in the top of the table until after I had paid for it and the lady selling it removed the microwave that was sitting on top of it.  Is there any way to repair that?  No big loss either way, I only paid $2 for it.  I plan to repaint the rusty metal parts.  I'm hoping this will fit next to my computer to hold the TV and printer.
My other purchase was my absolute favorite of the day.  A wonderful little chair for only $2.  I can't wait to do something with this little gem.
I also picked up a pair of shutters for $2 at a random sale and a pair of wooden lattice/shutter pieces.
I have no idea what I will do with these, but I just couldn't resist them.

I picked up a bunch of little .25 and .50 cent things as well, all told, I think my total today was about $15. 
Not too bad!
Hope everyone had a great day yard saling as well, I'd love to see what deals you got today!
Always,
Kelly

Thursday, June 24, 2010

10 Tasks - Day Two Project Update

I really think this challenge is what I needed to get my tush in gear.  I have been getting up early and instead of wasting that time, I've been getting stuff done.  I've also been doing a little on my breaks from work and heading right down to my studio when my work day is done!

Last night (Day One) I began working on organizing and labeling my surplus craft supplies.  I am forever buying something then stowing it in a box or a cabinet or a tote, ony to never see it again...until I re-buy it.  Then I find it right away!  Ugh!

I tackled an easier spot first.  My craft storage unit.  This is one of those modular scrapbooking/crafting units made up of 6 glass front cubes and two connecting "planks".  The top of it (not shown here) holds some of my favorite things, but the cabinets and the empty spaces are stuffed!  The photo storage boxes fit perfectly in there.  I spent two hours going through each box and putting like things together.  Then I labeled the boxes so I can find what I need more easily.  (I haven't gotten to the cabinets yet, they mostly hold scrapbooking paper and CD's.)  I was happy that when I was done I ended up with 4 empty boxes.


When not in use, I have curtains covering the open spaces to make it look neater.  I need to replace the curtain on the bottom, but I haven't found just what I'm looking for at the thrift store yet.

I also started working on my sketchbook to hold my project ideas.  I'm calling it Project Redo.  It will have sections for Inspiration, Before & After's & Future Projects.
First I painted the spiral edge of the sketch book with black paint, since it was purple and the paper I chose was black and white:

Then I adhered the paper (from the Scarlet Letter Basic Grey line) to the front:

I'm still working on the front lettering.  I'm not sure I like this.  I used plain chipboard because I thought it would illustrate the whole "redo" theme, but they don't show up too well.  I haven't adhered them yet so I may break out my Cricket and just cut the letters out of cardstock.  What do you think?
Lastly, I pulled out Nanny's Chair to start cleaning and dismantling it.  I am going to sand it down and paint it and recover the seat.  I call it Nanny's chair because it was the chair my Grandmother used at her sewing machine table.  I also have her sewing machine and the table.  I struggled with the decision to redo this chair because seeing it as is always makes me think of Nanny, but I think she would want me to update it and use it instead of just having it sit all dirty and ugly!
I also pulled out a wooden mirrored shelf that use to hang in my Grandmother's house.  No immediate plans to redo this, but eventually I would like to redo it and hang it in my bedroom. (Sorry it's so dirty and smudged, I tried to do a quick clean up to take a picture and ended up making a mess!)

So, so far so good, huh?  I'm really proud of myself for getting this much done.  I've also worked a little on some of the other tasks, but no pictures yet!
How is everyone else doing?  Let me know if you need some cheering on, I'll be glad to head over with my pom poms!
Always,
Kelly

Tuesday, June 22, 2010

A Little Motivation


I discovered Gina's site The Shabby Chic Cottage last night when I was getting all motivated to craft. She is having a 10 Day challenge starting Wednesday and I'm joining!

This is going to be a tough one for me because even though I gained several hours a day by no longer having to commute to work, I seem to have lost them again to sleeping late! But I'm going to work hard to finish my 10 tasks.

Check my task bar on the right for my progress and visit Gina's sight to look around and maybe even join the task yourself!

Always,
Kelly

Sunday, June 20, 2010

Painting The Town

I was so excited to get started on some of the projects I came across yesterday that I couldn't sleep last night. Literally. All of these ideas kept running through my head and I kept grabbing my iPhone to add things to the shopping list I had started.

I finally turned off the TV and went to "sleep" at 1:45 am. At 2:30am I gave up. I was just way too hyped to sleep. So instead of tossing and turning and keeping J up, I got up and went down into my studio. I was even nice enough to take the dog so she didn't wake up J.

I was going to leave Jovi in her crate in the living room because she was sleeping very peacefully, but Blair (our bed dog) had to go over and wake her up, so both dogs came down to keep me company. I say that tongue in cheek because both of them promptly jumped on the couch in my studio and fell asleep.

I turned on some tunes and got to work. I wanted to take an inventory of what I had and what I needed to buy. I actually made some progress organizing as well. I should organize more often because while I was looking for the box I know I have of mason jar lids (to make those hanging pincushions I shared the link for in my last post) I found some fabric I had "forgotten" about. Seriously, it was about $50 worth of fabric from my trip to Lancaster with my sister last fall. Oops.

So 4 hours later I had my shopping list ready and just had to pass the time until the stores opened. I ended up taking a short nap on the couch thank goodness.

I headed out to AC Moore and Home Depot. It was so stinkin' hot there was no way I was going to Walmart as well. I was able to get everything I needed.

I started painting as soon as I got home and I feel like I accomplished more than I actually did. I think it's because I only completed two painted things. But I have 3 other projects in-process. I can't get to the painting part until the glue dries.

My first project was to repaint a mirror. I've had this mirror for at least 10 years, maybe more. It's been on a time out in my studio until I either found a place to hang it or got rid of it. But I didn't like it anymore. That border that I really liked in the 90s is tacky to me now:

The painting did not go as smoothly as I had hoped. Maybe I'm out of practice. I had one problem after another though. First the primer didn't want to spray right. Then the lovely brown paper that I took the time to fit perfectly was blown off by the wind. I replaced the paper and the new paper blew partially off and stuck to an area I had just painted. It was a nightmare, but finally, I now have a shabby chic mirror. I think I need to distress it a little more though, I don't know. This is my first time distressing and I didn't want to take too much off:
My next project went much smoother, mostly because it was smaller. My mailbox was a disgrace. It was rusted and dirty. I really really wanted to paint it bright pink and paint flowers on it. Unfortunately, since we rent our house, it's not really my mailbox, so I just repainted it black. I'm not sure if you can really tell by the picture, but it looks a thousand times better!

That's all I got done painting-wise. Next weekend I am going to concentrate on redoing the bedroom. Since we got the new HUGE bed we can't fit as much in the bedroom as we use to. I'm going to do some more blog-stalking during the week this week and come up with a plan.

I think I'm going shabby chic. Wouldn't some distressed white furniture look great with these awesome curtains I found at a Nearly New Sale?


I love these curtains and since I spend a lot of time in the bedroom I want to make it a comfy place to be. Right now it's functional, but not comfy since we had to move out at least half, if not more, of my furniture.

Last but not least, here is a sneak peak into another project I'm working on. Below are all the ingredients to complete it. If you read my last post and followed some of the links, you might know what it is. Let me just say that so far, I am absolutely in love with the half-finished product.

That's it for now. I will post the finished product this weekend once it's done. But check back again this week because I'm taking a motivation challenge and I will need some encouragement from my readers...both of you! (LOL)

Always,
Kelly


Saturday, June 19, 2010

Inspiration

It was such a pretty sunny day Saturday and I ended up wasting it. Seriously, I do that every Saturday and then try to fit a bunch of projects in on Sunday.

I did go to a couple of flea markets and the local thrift today. I didn't find too much, but I was happy with the few things I did find.
I scored this cake plate for $2:


And a couple of cute vintage-y pillowcases:


I've been inspired by Laurie over at Scarlet Fig to find a foot stool to redo like this one. I just love her Tufted Tweets fabrics! So I've been hunting at the flea markets and thrifts to see if I can find a similar stool.

Last night I was bored and decided to spend the evening watching movies and surfing some of my favorite blogs...i.e. Crafty Porn. Get ready for some inspiring links. If I weren't typing this post at 11pm, I'd be outside with my spray paint getting busy! I haven't done ANY spray painting yet this year, but seeing all of these cool projects have really inspired me.

I love what Tammy at Tattered and Timeless did with these ladderback chairs. I've come across a couple of chairs like this, but didn't know what to do with the woven seating. Well, duh! Just get rid of it and make a cushioned cover! I also love how she made a rolling grocery cart into a storage bin for her craft room. I could kick myself right now because I saw one of these carts at a flea market for $4 today and couldn't talk myself into buying it.

I also love what Cincy over at Living in the 513! did with this luggage rack and chair.

And let's just say that Pam at DIY Design Fanatic is a woman after my heart with her love of spray painted things! How gorgeous is this red watering can?!?

Some other crafty home things that I came across that I just couldn't not mention were:
-These awesome hanging pincushions from Kendra at On My Side of the Room How quick and easy are these? And Kendra has a tutorial on making them as well!
-These must-have bookends from Rebekah at All Thingz Related. Holy Moly I'm soooo making these!
-Homemade Apothacary Jars by Stephie at Made by Stephie. (Also on my to do list!)
and
- Pretty much EVERYTHING made or redone by Whitney & Ashley at Shanty2Chic

I plan to run to Home Depot and buy all the stuff for the apothacary jars and bookends with maybe a side trip to Walmart to restock my spray paint since I'm running really low.

I will post updated pics as I begin painting again. I have promised myself (and my wonderfully patient fiance, J) that I will get rid of 3 things for every new thing I bring into the house. I think I need to clarify the terms of that, since I don't think the vintage linens should count...

By the way, in case you are inspired to spray paint everything in your house, like I am, I have two tips for you.
First, I recommend buying a name brand of spray paint. When I first started my painting projects, I bought the cheap .99 spray paint from Walmart. I quickly learned that when painting a bigger project, such as a big corner table like the one I painted last summer, your finger will go numb quickly and it doesn't spray as evenly. Now I only buy Krylon Indoor/Outdoor paint because not only does it come in awesome colors such as Blue Ocean Breeze, Bahama Sea, Gumdrop & Watermelon, but you get an even spray and a better coating. I am also, not a big fan of sanding wood, so I tend to just primer everything first, then paint.
Check back in the next day or so to see my Sunday painting projects...they are still drying right now!
Always,
Kelly

Monday, June 14, 2010

Say Yes To The Hex, Part Two - Staying Organized

One thing that I learned quickly when playing with hex's is that if you aren't careful (like me) you will end up with hex's and foundation paper pieces everywhere Like me). I work on my hex's in bed, which is situated right beneath a ceiling fan. I set myself up for disaster, don't I?
I had to come up with a way to keep everything together. I got sick of crawling all over the bed and floor to pick up stray paper.
Here is what I came up with for the paper:

As you can see, I skewered my hex papers. As I cut out each page of papers, I take the time to punch a small hole in the center and then push them right onto a skewer. I use a very small hole punch that I had left over from my scrapbooking days, which makes for a tighter fit so the papers don't slide back and forth on the skewer, but I would think that a regular sized hole punch would work just fine.
The skewer fits rather nicely into the open weave of my cheap, Dollar Store basket which also holds my scissors, thread, pincushion, templates and other odds and ends. I admit to cleaning out my basket before taking this picture because it had everything but the kitchen sink in it!
For every size hex I cut out of paper, I make a corresponding template, with the 1/4" allowance added, out of chipboard. This way I can just trace the template onto my fabric and have the perfect seam allowance every time. I hate to "wing it", I'm so far from being a "wing it" person. Ask anyone.
My other organizer that I've been using is made by June Tailor. I really don't know if these are made anymore because my Mom gave me this one at least 10 years ago.

This is a cutting mat on top of a wooden box with several compartments. The mat slides into a slot at the top.
Here is a messy picture of what it looks like inside (I forgot to take a full view picture after I organized it, but it looks better now, I promise!) The second picture is of one space after it was organized with some 1 1/2" hex's ready to use.


So that's what keeps me organized so far. I would love to hear from some fellow hex-lovers about how you stay organized!
Stay tuned for more hex updates in the future. I'm currently working on a placemat using 1/2 inch hex's. This is going to take awhile!
Always,
Kelly

Sunday, June 6, 2010

Say Yes To The Hex

I have a new obsession. Hexagons. I'm sure I've mentioned before that my Mom's favorite quilt to make was anything with Hex's. I would guess she made at least 20 quilts (all hand quilted, mind you) out of Hex's. She did mostly Grandma's Flower Garden's but also made each of her grandchildren Hex quilts.
In fact, when she passed away, each of her five children brought their favorite quilt from Mom to the funeral home to display and I believe every one of them was a Hexagon quilt.
My all time favorite quilt was the one she made for my wedding - a Wedding Ring Quilt. (The quilt was definately made to last...the wedding, not so much!) But this quilt runs a close second:

I use to watch my Mom assemble these quilts in amazement. She didn't use a pattern, didn't preplan the layout, she just made them piece by piece.
Here is a close up of another quilt of Mom's using hex's - hand pieced and hand quilted.

I'm not sure what the pattern is called, but, as you can see, it is much-loved and used daily on my bed. This quilt was actually the quilt that my Dad used on his bed before he passed away and each night that I sleep under it, I feel close to both Mom and Dad.
I have seen a revival lately of the hex quilts using English Paper piecing and decided to try my hand. I spent most of last Sunday in my new King Size bed cutting and basting pieces.
That, I found, is the fun and easy part everyone speaks of. Assembling the hex's is another story altogether. My first attempt turned out okay, but puffy and not so great.

My second attempt came together a little easier since I had spent an hour or so scouring the internet for better instructions. Turns out, I was making extra work for myself when piecing the hex's together.

I was really insprired to make a keychain like Xperimentl made and posted on Flickr. Check out the scale on that...each hex is the size of a dime! My picture does not show scale, but each hex is also the size of dime. I used 1/2 inch hex's. I actually thought it would be a lot harder to work with the tiny hex's, but the paper foundation makes all the difference! Just like Xperimentl, I made my keychain double-sided:


I have dedicated today to hex's as well. I have come up with a great way to organize my hex's and to keep all of the foundation pieces from flying all over the place when I'm working in my bedroom with the ceiling fan on.
I will post again tomorrow with more on that.
But for now, if you have considered making the plunge into hex's, I say Go For It! I never thought I could do it, but this is definately addictive and so portable!
Always,
Kelly

Weekend Wrap-up

Yesterday, Jean and I spent the morning doing one of our shared hobbies, going to flea markets and yard sales. This was actually my first Saturday of the year that I went out to the sales. I've been trying hard not to go because I usually end up buying stuff I don't need just because it's cheap.
All in all I did pretty well though. I only ended up spending $8.50 total.
My favorite find was this vintage Sears & Robuck kitchen set:

I had picked up one small piece of this set about 6 months ago at a thrift store that I use to hold my pencils and pens in my studio. One of the yard sales we went to had 4 more pieces in a box for $3.50. The funny thing was, the very next yard sale we went to had even more pieces of it for $5.00. Jean and I split the $5.00 sale and I took the clock and the kitchen utensil holder and she kept the rest.
I think I like this so much because it reminds me of a 1970s retro kitchen.
I also picked up a dvd/vcr combo for $1 and a cat carrier that I had been looking for, also for $1.
When I came home and was trying to cool down, I glanced over at the dining room window and saw this:

Yay, the one plant I bought this year finally flowered! It was touch and go for the last week, because the poor plant was wilting in the heat, but I brought it inside and it decided to live!
J was sick all day Saturday, so I decided to make him (okay, ME) a cake. It looked yummy until I took it out of the bundt pan:

Once I flipped it, it fell apart. But it still tastes divine! It's an Angel Food cake with strawberries. I always use the Angel Food mix and add canned or frozen fruit instead of water, which keeps it lower calorie, but tastes better than plain Angel Food Cake.
Lastly, I wanted to share a better picture of the fun placemat I made for the bedroom last week. I am a sucker for novelty fabric (another trait I inherited from Mom) and this monkey fabric from Anna Griffin just makes me smile every time I see it.

So that was the highlights of my weekend. I do have a new obsession to share that took up most of my Sunday, but I will save that for my next post.
always,
Kelly